
While I’m in between units to write about (I need to dedicate some time to getting the lightbox out and shooting my recent projects, but time is one of those things I never seem to have), I figured I’d address a popular request. I’m often asked how I did the molten Daemon skin on my Bloodletters and Bloodthirster, and while explanations are buried in those respective articles, I’ve not really put a step by step guide in one easy-to-find place so far.
Since I have some photos lying around from when I painted my Daemons, I’ve put together a tutorial for painting molten skin below – it’d probably work well for an Avatar of Khaine, a Balrog, a corrupted Salamander, a Fyreslayer Magmadroth and anything else that is going for the ‘inner heat’ look. Have a read and let me know what you think!
Paints needed (GW unless said otherwise):
- White undercoat (Corax White in my case)
- Flash Gitz Yellow
- Fluorescent Yellow (Vallejo)
- Fire Dragon Bright
- Troll Slayer Orange
- Fluorescent Orange (Vallejo)
- Fluorescent Magenta (Vallejo)
- Wazdakka Red
- Rhinox Hide
- Bloodletter
- Lamentor’s Yellow
- Dark Reaper
Techniques used
- Drybrushing
- Overbrushing
- Glazing
- Layering
The basic approach can be boiled down to ‘reverse shading’ – we start with a very bright (and warm) colour, then drybrush and layer darker and cooler colours on top, to create the impression of an inner heat that gradually cools to black skin or volcanic rock the further from the heat source we get.
I’ll be using photos from my Bloodthirster primarily, but in some places I might demonstrate a stage with a different model where I forgot / didn’t bother to photograph a certain stage with the ‘Thirster.
Step 0 – photo references
When attempting something new, photo references are always a good idea. As I was going for a lava theme, looking up photos of.. well, lava, made sense. I found some lovely pictures of the this that demonstrated what I wanted to achieve:
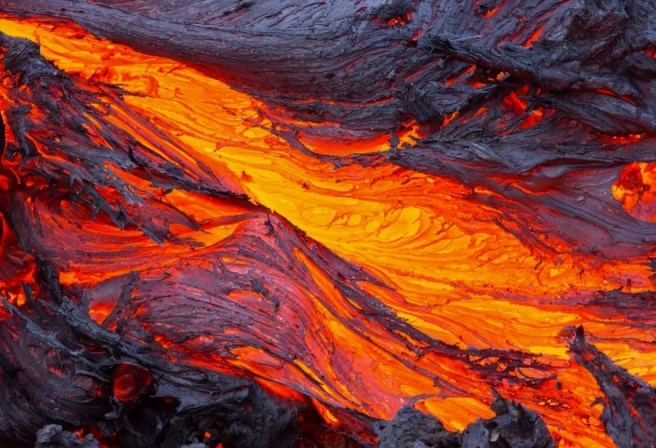

You can really see what I mean about the cooling – the colours quite rapidly go from a glowing yellow, through orange and red to a dull hot-metal pink, and finally an almost bluish grey in certain lights. It’s a really nice contrast that I thought would look great on a model.
Step 1 – Unremarkable White

…not a lot to say here, other than that a light undercoat is pretty much mandatory. I’d advise a white spray over a yellow one, as even things like an Aveland Sunset spray (is there such a thing?) would be designed to have brighter yellows over the top. We’re starting at maximum brightness and dulling it down, so white it is.
I used Corax White spray with a thin coat of White Scar over the top, but to be honest – a white spray is a white spray.
Step 2 – Oh-God-My-Eyes Yellow

Paint it yellow! With this step we’re laying down the brightest, hottest part of the model, getting right into the recesses where the molten core would bleed through most prominently.
I started by laying down a mix of Flash Gitz Yellow and Vallejo Fluorescent Yellow all over the model, at about a 2:1 ratio. Fluorescent paints are not to everyone’s tastes, but they really make the model pop. However, fluorescent yellow used neat (you can see some on the pallette) has an almost greenish tinge in natural light, so some Flash Gitz was used to help get the hue right.
The entirety of this guide can be prefixed with “adjust to taste,” by the way. For my Bloodthirster I wanted it to look really hot and elemental, so my deepest layer was as hot and vibrant as I could get it. My helbrute from my previous post however, I did with a much cooler, more smouldering look – have a play around with recipes.
The photo’s actually of step 2, where I had started to lay down the next colour and add some depth to the model. As I said, these photos are cobbled together rather than shot for purpose, but still, if you look at the above you can see the two stages clearly enough.
Step 2 – Slightly-Less-Violent Yellow
Once the fluorescent basecoat was done, I started laying down cooler colours, the first of which was a heavy overbrush of a Fluorescent Yellow / Fire Dragon bright 1:1 mix. For those unfamiliar with it, “overbrushing” is a term GW (I think) coined a while back, which is more or less heavy drybrushing without getting rid of as much of the paint on the brush. The result is a more even coat than the dusting effect of drybrushing, while still avoiding the recesses of the model – a good way to lay down a midtone quickly over a textured piece.
As you can see on the above picture, overbrushing leads to relatively flat colours on smooth areas like the individual muscles, but it leaves some pure yellow in between them.
Step 3 – Presidential Orange

With each stage, I used less paint and less vigour with my overbrushing, moving to darker colours. This stage was a 2:1 mix of Troll Slayer Orange and Fluorescent Orange. I started to fade out the fluorescent paints at this stage, but a small measure of them still helped keep the orange vibrant and hot.
Step 4 – Englishman-At-The-Beach Red

With this stage, I was done with the overbrushing, and switched to more traditional layering. The mix for this stage was approximately a 2:1:1 cocktail of Wazdakka Red, Fluorescent Magenta and Lahmian Medium – the medium thinned it out to a heavy glaze-consistency, and the Fluorescent Magenta kept the vibrancy up while moving out of orange and into red territory in terms of heat.
I’m not really sure what to call the technique, as it’s not quite layering and not quite glazing either – I basically put a globule of the thinned paint in the ‘coldest’ part of the area I was painting (say, the Bloodthirster’s bicep), washed my brush and then quickly dragged it around the area, spreading a smoothly thinning area of paint toward the hotter areas. The result is a fairly decent gradient from the pinkish red to the yellow, for not too much work.
Step 5 – WIP-Barbecue Brown

This stage was a huge relief, as it was when the model started to finally look a bit like the inspiration images and the idea in my head. The recipe I used was a roughly 1:1:1 of Wazdakka Red, Lahmian Medium and Rhinox Hide – Now done with the fluorescent paints and definitely working on the colder, less volatile areas, a splash of brown helped cool down the red without transitioning straight to black.
I finally put away my big brushes at this point too – this was now all being layered on traditionally, painted in parallel lines that followed the shape of the musculature. The effect was instantly dramatic, I have to say. For areas like the wings – we can see I’ve started on its right one – I stuck to drybrushing, treating each membrane like one muscle for the purposes of figuring out what was hot and cold on the model – so the skin furthest from the bones was coldest, and thus got the heaviest drybrushing.
Step 5 – Overdone Barbecue Grey

Almost done at this stage! Now that I had moved from yellow through orange and red to cooling brown, the only parts left to do were the ‘black bits’ – the lumps of re-solidifed rock that give lava that dynamism and contrast. I did consider doing them actually black or neutral grey, but decided instead to add a subtle hint of bluish green to them – a complimentary and contrasting colour to the reddish orange of the model’s recesses.
The technique was initially the same as the previous stage – a layering of a 2:1 mix of Dark Reaper and Rhinox Hide, followed by a highlight of pure Dark Reaper. Depending on the area, the highlight was done as either a sharp edge, such as the horns or cheekbones, or a gentle drybrush on parts like the wing membranes or the Khorne scar on the chest.
Step 6 – Glazing and focal points

The final stage! All that was left was to ‘bring it all together,’ so to speak. The model looked pretty damn striking as it was, but I found that by using the Bloodletter and Lamentor’s Yellow glazes in varying ratios to each other, I could pull the transitionary areas together much better than I could ever hope to with just overbrushing. A 1:1 mix of the above two glazes between the pectorals helped link them together nicely, for example, suggesting that the ribcage overall is fairly uniform in depth. I also used it to just cheat in a few areas, and tidy up spots that I’d forgotten to layer up properly. 🙂
I also went back in with Fluorescent Yellow to pick out the absolute hottest areas of the model anew – in this case, the eyes, the nose and the inside of the mouth. You can see that greenish tinge I mentioned in its mouth, so perhaps the latter wasn’t the best of ideas, but for the eyes it really helped make the grinning face the focal part of the model.
Step 7 – The Rest of the Model
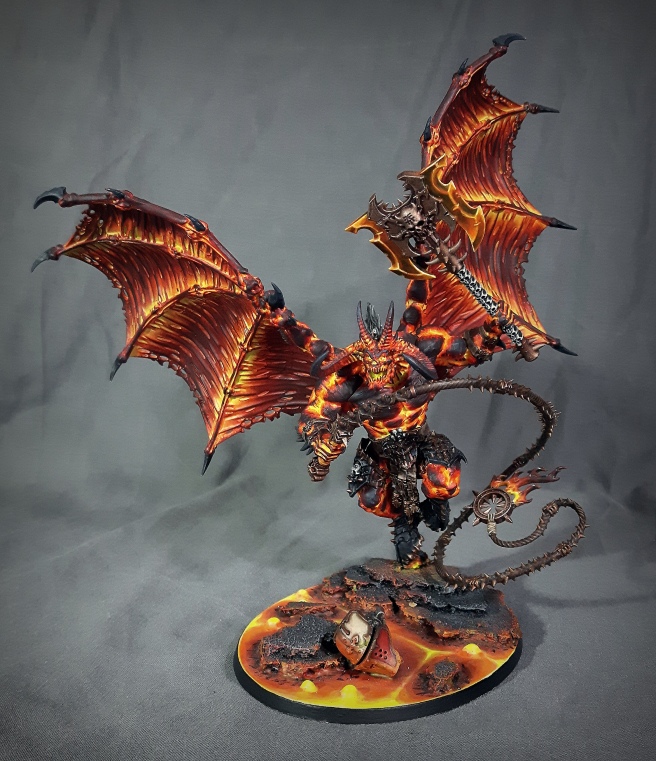
..And that was it for the skin! Fortunately for models like Daemons, that’s actually the vast majority of the model and the rest is as simple or complicated as you choose to make it. Hopefully as this rambling tutorial’s demonstrated, the technique’s not actually that hard, just a bit of a foreign method for those of us used to painting ‘normally.’
Hopefully this is of use to someone, and if anyone does try the technique, please let me know – I’d love to see the results! And if you guys are interested in this sort of blog post in general, tell me – I’ve got a few other things like lava bases, blue-black power armour and so on that I could write tutorials for.
I’ll leave you with some snaps of other models I’ve used this on – nothing new for those that follow this blog, but pointers in one place that the technique can work on big and small models alike. Thanks for reading, and stay tuned for more!


Just…wow.
That is incredible! Huge kudos!
LikeLike
Thanks – happy to be of help!
LikeLike
The quality of your heat/lava painting never fails to amaze me, and the Bloodthirster is looking absolutely fabulous! I actually know two or three projects that try to go for the same effect, but fail so horribly, while your lava look always turns out absolutely incredible!
I actually tried to channel the merest scrap of your effect for two models in my recent Ordo Hereticus warband: Both are wearing the flaming headdress from the Empire Flagellants, where the metallic “cage” is barely visible within the flames. Now my effect isn’t nearly as accomplished as yours, but your daemons were a great resource to fall back on for reference during the painting! Cheers for that!
I also have one very minor gripe, though: Looking at your Bloodletter, I realise the hard line where the “face mask” bit attaches to the back of the head is very clearly visible: I’d suggest blending those two bitz together a bit better in the future (with some filing, a bit of Liquid GS or merely by melting it all together with some plastic glue), especially since your painting is so awesome and deserves the five minutes extra work during the building stage 😉
Anyway, simply fantastic work! 🙂
LikeLike
Happy to be of help for the acolytes – God knows you’ve inspired my work enough that it’s time I return the favour, no? 😉
Fair critique on the bloodletters – I must admit that I got rather lazy when building them. It’s a shame as, as you said, the shoddy build craft really stands out. Ah well, I know for the next unit that it won’t be only me that notices the laziness!
LikeLike
Incredible work, you just gave me a great idea how to do a zombified dragon with the same technique but different colors (green and purple instead of yellow and red). I just have a question, do you tin your paint when using this technique ?
LikeLike
I thin them with medium, yeah. The only time I wouldn’t thin paints would be for drybrushing.
LikeLike
Awesome effect! Really outstanding work.
LikeLike
Thank you!
LikeLiked by 1 person
I well done and thank you so much for managing to find the time to get around to this. Be be sure to do your tutorial some juctice when my blistering, possessed iron hand reaches the end of the que.
This tutorial is amazing man. I really value the effort and detail you have put into this. A Tutorial is one of the greatest things about hobbying, esspecially ones offered for free… I feel like its a really cool window into the hobbying mentality and community. Sharing ideas for the benifit of everyone, for the sake of just improving the quality of everyones work and nothing else. Im super chuffed you got around to doing this one. Thanks again on behalf of the hobbying community!
LikeLike
Happy to be of service! I agree wholeheartedly – tutorials, project logs and whatnot are what really attracted me to blogging in the first place. I hope that this one is of use!
LikeLiked by 1 person
That looks amazing, and thanks for the tutorial. Your step names are brilliant as well. Presidential orange has to be my favourite; so patriotic.
LikeLike
Heh. I’m a Brit myself, but I figured it fit nicely. 😀
LikeLiked by 1 person
Brilliant work and a fantastic tutorial. Thank you!
LikeLike
This guide is great. One question, though!
When you wrote 2:1 of flash gitz and fluorescent yellow.. did you mean: 2 parts gitz. 1 part fluorescent.
Or?
2 parts fluorescent yellow and 1 part flash gitz.
LikeLike
Hey! It’s the former – two parts flash Gitz, one part fluorescent just to give it that extra brightness.
LikeLike
Fantastically done! One of the best internal heat signatures I’ve seen and the tutorial is exactly what I was looking for. My DM asked me to do something like this with another figurine and I needed the insight and guidance. With this to reference, I’m sure to get it looking good.
My color palette will be similar but won’t contain the flourecent paint. Instead I’m going to try my luck with using the brightest yellowI can find and for the darks, I’m hoping my eye will enable me to mix my own blends of browns and almost blacks deep enough to mimic the cooled lava.
Thank you for making such an awesome and inspiring tutorial. I’ll surely stop back by and check out your other posts.
LikeLike
Omg! That effect looks amazing! My boyfriend is an avid D&D player and to get me involved I’m going to learn how to paint his figures. Any advice for a first timer?
LikeLike
Hoooboy. Tall order. If you’re completely new to painting, you really can’t go wrong with GW’s Getting Started Videos.
LikeLike
Wow truly enquiring. I just got started in painting. Trying to collect as many step by step guides as I can. Do you have more guides? Really well done!
LikeLike
I can find all the paint except Fluo Orange and Fluo Magenta. What are some good substitutes for them? I’m doing my all daemons like this
LikeLike
Was just pointed to this and I am excited to try it. Looks fantastic. Just FYI the two glazes in your tutorial no longer exist. I will be substituting for them. Again beautiful work and thanks for doing this.
PS: have you considered teaching this at reapercon. It’s over Labor Day weekend in Denton (just north of Dallas) Texas
LikeLike
Hey! Glad the tutorial reads well, and good luck trying it. 🙂
I’m not sure what I’d recommend as substitutes for the glazes – a thinned contrast paint in the right colour might work, though.
I live in the UK, so it’s a bit of a trek to get to Reapercon sadly. XD
LikeLike